Adding Box Squats to your Strength Training
Posted: January 6, 2012 Filed under: 00 - Lifting Tips, 01 - Squat Tips | Tags: Box Squat Technique, Box Squats, Leg Strength, Muscle Building, Power, Powerlifting, Squat Technique, Squats, Strength Leave a comment »
There are actually several reasons to add box squats to your strength training, and your technique will differ slightly for each. When considering whether to use box squats in your training routine, you need to understand the purpose, and select the right technique.
- Learning to squat: If you’ve never squatted before, performing box squats can help you get comfortable sitting into your squat. To squat properly, you need to learn to sit into it just like you would sit into a chair. Using a box can give you a sense of security as you learn to sit back into the squat. When using the box squat to learn squat technique you should use little or no weight, and concentrate on controlling your descent so you land on the box lightly. Come to a full rest on the box before standing back up. Once you’re comfortable sitting into your squat you can move on to normal squats and work on loading up the bar.
- Touch and Go: The touch and go is used to help ‘find depth’. This form of box squats helps you find proper squat depth (thigh is below parallel). You do not come to full rest on the box when performing touch and goes. Descend until you feel the box then immediately drive back up. Once your comfortable hitting depth remove the box perform normal squats.
- Full Box Squats: Full box squats are a tool that can help build explosive power out of the bottom. When performing full box squats, descend until you come to a full rest on the box then drive explosively up off the box. Avoid leaning forward to begin the ascent as this can reduce the emphasis on your glutes and hams. As opposed to touch and goes full box squats can be used at any time as an alternative to normal squats. They are a great training tool to create strength at the bottom of your squat and build explosiveness out of the hole.
General Tips for Box Squats:
- Use a box that is the right height for appropriate squat depth. Do you really need a box to tell you your squats are high? I’ll help with that: “your squats are high”. Now suck it up and drop your squats into the hole.
- Never anticipate the box. Don’t squat to sit onto the box. Keep descending with proper squat technique until you hit the box then drive back up. If you are slightly surprised by hitting the box then you’re doing it right.
- Land lightly on the box. Descend in a controlled manner and land lightly on the box. Plopping down hard on the box with a loaded bar on your back is a sure way to end your lifting career.
- Unless you’re doing full box squats, once your squatting issue is resolved, move on to regular squats.
If you’re using the box squat because it’s in the latest edition of the Spartacus Leg Mauling training program, step back and assess why you’re using the box. If it’s a fit with your training goals, select the appropriate method and a box that will drop you into the hole.
From the Ref’s Chair: The Deadlift
Posted: December 5, 2011 Filed under: 03 - Deadlift Tips | Tags: Deadlift Technique, Deadlifts, Leg Strength, Power, Powerlifting, Strength 4 Comments »
Grip: I’ll dig into your grip on the bar in more detail in another article; however I wanted to touch on some of the mistakes I saw. If you can’t hold onto the bar, you can’t pull the weight. You should be taking every measure you can to improve your grip.
- Thumbless grip: There is no reason to use a thumbless grip on the deadlift. If you can hold the bar thumbless, quite frankly you don’t have enough weight on the bar.
- Chalk: I saw a lifter fastening his belt after he’d chalked his hands. By the time he approached the bar to pull, the chalk was on his singlet and his belt, but not on his hands. As cool as you look covered in blood, sweat and chalk, chalk on your attire does not help you hold onto the bar. Chalking your hands should be the last thing you do before stepping onto the platform.
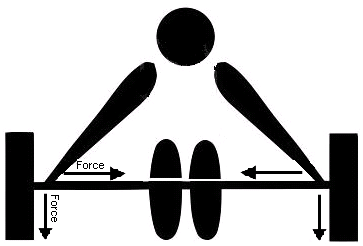
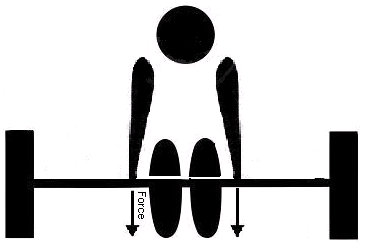
- Hand Placement – too wide: This one I see all the time – using an exceptionally wide grip on the bar. A wide grip creates two disadvantages for you. First, a wider grip shortens your arm span, meaning you start the pull closer to the floor. This increases the range of motion you must pull through, and puts you at a disadvantaged position to start the pull from. Secondly, you now have forces straining your grip in two directions – one straight down towards the floor, the second inward pulling your hands toward the neutral position. Whether you’re pulling sumo or conventional, your hands should hang straight down from your shoulders. This will lengthen your arm span to the bar to its maximum, and eliminate the horizontal force from straining your grip.
Hand placement too wide
Correct hand placement
- Hand Placement – too narrow: Not gripping the knurling. Unless you have an exceptionally small frame with narrow shoulders, you should try to grip the bar on the knurling.
Stance: Choose either a sumo stance or a conventional stance. I saw too many people taking a stance somewhere in between. There is no advantage to this. With an ‘in between’ stance you drag your hands across your legs through nearly the full range of motion, peeling your grip loose.
- Conventional: Your feet should be close together and toes pointed forward. Unless you have an exceptionally wide frame, your legs should be inside the knurling. With your feet in this position, your arms can hang straight down from the shoulders, grip the knurling, and not drag across your body as you complete your pull. Your legs and clothing won’t catch on the knurling which would increase the friction, and thereby increase the difficulty of the pull.
- Sumo: Although dependent on your build, a sumo stance is very wide, well outside shoulder width, with your toes pointed out. For my sumo setup, I place my feet so the 81cm rings in the knurling are at my shins. Your grip will be inside your legs, hang straight down from your shoulders, and optimally gripping the knurling. Your hand placement should be approximately the same for the sumo pull as for the conventional deadlift.
Setup: Don’t play around with the deadlift. A loaded bar sitting on the floor waiting for you to pull can be intimidating. If you take the time to think about it, your mind will talk you out of the lift. Grab the bar and pull – GRIP and RIP
- Pausing at the Bottom: Once you grip the bar, and drop your hips to the starting position, pull immediately. Sitting at the bottom works against you in two ways. First, as mentioned, you start thinking about the lift. Your mind will try to tell you how heavy the weight is. Secondly, as you drop your hips into the starting position, you should try to tighten your glutes and hamstrings and use them to explode off the floor. If you’re pausing at the bottom you lose that tightness and any advantage you can get out of it (ever notice how the second rep of deadlifts is much easier than the first when deadlifting for reps…?).
- Exhaling at the Bottom: Don’t exhale, grunt or scream as you start the pull. Losing the air from your chest will reduce your upper body stability. Try to hold the air in your chest until the bar passes your knees and then begin exhaling as you lock out.
If you would like a complete walkthrough of the conventional deadlift you can read my article on deadlifting technique.
Go Slow – Train Yourself to be Weak
Posted: November 29, 2011 Filed under: 00 - Lifting Tips | Tags: Lifting Technique, Power, Powerlifting, Strength, Training 8 Comments »I picked up a little flyer at one of the major gym chains the other day. It appears to be noob training advice for their 2012 Fitness Challenge. If I may quote:
GO SLOW
Get the most out of each rep by contracting and releasing slowly. Aim for a 5-second count in each direction.
In which sport exactly do you train to function slowly? As a football coach are you going to train your offensive linemen to aim for five seconds to come off the line when the ball is snapped? The play will be over by the time he makes it out of his three point stance! Ok, that’s a bit generous, he’ll be flat on his CENSORED before he gets to 3…
Now, there are times and places to include slow-count work in your training program, but if you don’t know why you’re doing it, do yourself a huge favor – just don’t. This flyer spews one of the single worst pieces of training advice I’ve ever read (IMHBCO). I already spend far too much time training new lifters to speed up their lifts, and complete them explosively.
If I were to give advice to new lifters without knowing their training goals, I would go in the opposite direction:
- When learning a new exercise, perform it in a deliberate manner until you can perform it properly – deliberate does not mean SLOW, perform the movements only as slowly as needed to complete the exercise properly
- Control the bar throughout the range of motion on both the eccentric (downward portion of the lift) and concentric (upward portion of the lift) movements
- Lower the bar in a quick but controlled manner
- Raise the bar explosively, try to complete the concentric portion of the lift as powerfully as possible
Deadlift Rack Pulls
Posted: September 18, 2011 Filed under: 03 - Deadlift Tips | Tags: beginner, Deadlift Technique, Deadlifts, Muscle Building, Power, Powerlifting, Rack Pull Technique, Rack Pulls, Strength 1 Comment »Deadlift rack pulls, also called deadlift lockouts, can help you build significant lower back strength, and drive power into your squats and deadlifts.
Exercise Purpose
- Deadlift rack pulls help you train the finishing movement for your deadlift.
- They allow you to pull a significantly higher weight to lockout than you would use for your full range of motion deadlifts. Rack pulls can build significant lower back strength.
- By lifting heavier weight, they train your body and central nervous system to recruit more muscle fibers for the lift.
- To a lesser degree, rack pulls also work your gluteus maximus (glutes) and hamstrings.
For the general strength trainers, lockouts are also a useful lower back compound exercise. By starting the lift just below the knees, rack pulls eliminate much of the leg drive from a full range of motion deadlift. This allows this exercise to focus the work directly on your lower back.
If you’d like to learn how to perform rack pulls correctly, check out this article on the exercise technique: Deadlift Rack Pulls


